들어가며
AtomicInteger 클래스는 원자적 연산으로 자바의 동시성 문제를 해결하는 방안 중 하나입니다. AtomicInteger 클래스의 incrementAndGet() 메소드에 대해 자세히 알아보도록 하자.

환경
- 아키텍쳐: x86
- os: linux
- JDK17
AtomicInteger
AtomicInteger 클래스에 대해 미리 설명해 둘 정보가 있다.
    private static final Unsafe U = Unsafe.getUnsafe();
    private static final long VALUE
        = U.objectFieldOffset(AtomicInteger.class, "value");

    private volatile int value;
AtomicInteger 는 내부에 int value 값을 사용해서 값을 나타내는 것을 알 수 있다.
그리고 Unsafe 라는 객체를 참조한다.
VALUE 는 value의 메모리 주소를 참조하기 위한 offset 값이다.
AtomicInteger의 incrementAndGet() 메소드 내부를 보자.
    public final int incrementAndGet() {
        return U.getAndAddInt(this, VALUE, 1) + 1;
    }
여기서 U 는 참조하고 있는 Unsafe 의 객체이다.
U.getAddInt() 메소드를 통해 값을 불러오고 그것 보다 1 큰 값을 리턴하고 있다.
여기서 this 와 VALUE 는 왜 필요할까?? 나중에 보겠지만 CAS 연산은 메모리 주소가 필요하다. this 를 통해 현재 객체의 주소, VALUE 를 통해 value 에대한 메모리 offset 을 전달해주는 모습이다.
Unsafe
Unsafe 의 getAndAddInt() 메소드를 확인해보자.
    @IntrinsicCandidate
    public final int getAndAddInt(Object o, long offset, int delta) {
        int v;
        do {
            v = getIntVolatile(o, offset);
        } while (!weakCompareAndSetInt(o, offset, v, v + delta));
        return v;
    }
@IntrinsicCandidate 어노테이션이 붙어 있다.
이 뜻은 JVM 상에서 구현된 코드로 대체될 수도 있다는 뜻이다.
코드의 형태는 Compare And Swap(CAS) 형태를 띄고 있다.
v = getIntVolatile(); 을 통해 캐시에 있는 값이 아니라 메모리 가시성을 확보한 v 값을 가져오는 것을 볼 수 있다.
그렇다면 weakCompareAndSetInt() 메소드를 들어가 보자
    @IntrinsicCandidate
    public final boolean weakCompareAndSetInt(Object o, long offset,
                                              int expected,
                                              int x) {
        return compareAndSetInt(o, offset, expected, x);
    }
여기에는 별다른 내용이 없다. 바로 compareAndSetInt() 메소드로 가보자.
    @IntrinsicCandidate
    public final native boolean compareAndSetInt(Object o, long offset,
                                                 int expected,
                                                 int x);
메모리에 대한 직접 접근과 하드웨어의 atomic operation을 지원받아야 해서 native 코드로 작성되었다. native 코드를 좀 더 추적해보자.
앞으로 현재 값은 expected, 예상값은 x 로 통일해서 표현하겠다.
계속 추적해나가다 보면 변수명이 변경되기 때문이다.
Unsafe.cpp
https://github.com/openjdk/jdk/blob/master/src/hotspot/share/prims/unsafe.cpp
에 있는 unsafe.cpp 파일을 참고하였다.
compareAndSetInt 는 openjdk에서 아래와 같이 구현되어 있다.
UNSAFE_ENTRY_SCOPED(jboolean, Unsafe_CompareAndSetInt(JNIEnv *env, jobject unsafe, jobject obj, jlong offset, jint e, jint x)) {
  oop p = JNIHandles::resolve(obj);
  volatile jint* addr = (volatile jint*)index_oop_from_field_offset_long(p, offset);
  return Atomic::cmpxchg(addr, e, x) == e;
} UNSAFE_END
c++ 언어로는 위와 같이 구현되어 있다.
oop 는 간단하게 자바 heap 의 포인터라 생각하면 된다. oop p 와 offset 을 이용하여 해당 값의 메모리 주소 addr 을 구한다.
Atomic::cmpxchg 에 대해 더 추적해보자.
Atomic.hpp
Atomic.hpp 는 os, 아키텍쳐별 구현이 모두 다른다. 여기서는
https://github.com/openjdk/jdk/blob/master/src/hotspot/os_cpu/linux_x86/atomic_linux_x86.hpp
x86 기반 linux OS 의 Atomic::cmpxchg 구현을 보자.
template<>
template<typename T>
inline T Atomic::PlatformCmpxchg<4>::operator()(T volatile* dest,
                                                T compare_value,
                                                T exchange_value,
                                                atomic_memory_order /* order */) const {
  STATIC_ASSERT(4 == sizeof(T));
  __asm__ volatile ("lock cmpxchgl %1,(%3)"
                    : "=a" (exchange_value)
                    : "r" (exchange_value), "a" (compare_value), "r" (dest)
                    : "cc", "memory");
  return exchange_value;
}
machine instruction level로 작성되야 하므로, 어셈블리어로 작성되었다.
간단하게 설명하면 lock cmpxchgl %1, %3 을 실행하라는 뜻인데
여기서 %1은 exchange_value 즉 예상값 x, %3은 현재값이 있는 메모리 주소, 즉 addr 을 의미한다.
cmpxchg
인텔의 x86 아키텍처 명세서 중 cmpxchg 에대해 확인해보자.
https://www.intel.com/content/www/us/en/developer/articles/technical/intel-sdm.html
Intel® 64 and IA-32 Architectures Software Developer’s Manual Combined Volumes: 1, 2A, 2B, 2C, 2D, 3A, 3B, 3C, 3D, and 4 문서를 다운받고, Volume2 를 확인하면 된다.
CMPXCHG r/m32, r32
Compare EAX with r/m32. If equal, ZF is set and r32 is loaded
into r/m32. Else, clear ZF and load r/m32 into EAX.
레지스터 EAX -> 현재값 expected
r/m32 -> 메모리 주소 addr
r32 -> 예상값 x
즉 현재값 e 와 실제 메모리에 있는 값을 비교해서 같다면, ZF flag를 set 해주고 예상값을 메모리에 load 해준다. 아니라면 ZF flag 를 해제하고 실제 메모리에 있는 값을 현재값 expected에 옮겨준다.
여기서 EAX 레지스터란 x86 아키텍처 에서 사용하는 범용 32bit 레지스터 이다.
여기서 위쪽에 작성된 어셈블리어 와 약간 다른 부분이 2가지가 있다.
"lock cmpxchgl %1,(%3)"- 먼저 cmpxchg 가 아니라 cmpxchgl 을 사용하였다.
이것은 어셈블리 명령어 에서는 맨뒤에 접미사로 데이터 크기를 지정해주기 때문이다.
'b': byte (8비트)
'w': word (16비트)
'l': long (32비트)
'q': quad word (64비트)
이 경우 4byte int 연산이었기에 뒤에 접미사 l을 붙여준다.
- 두 operand 의 순서가 다르다.
를 보면 예상값 x, 메모리 주소 순이다."lock cmpxchgl %1,(%3)"
인텔의 명세서를 보면
CMPXCHG r/m32, r32메모리 주소, 예상값 x 순이다.
이는 AT&T 와 INTEL 의 어셈블리 문법이 다르기 때문이다. 두 체계는 operand 위치를 정반대로 사용한다.
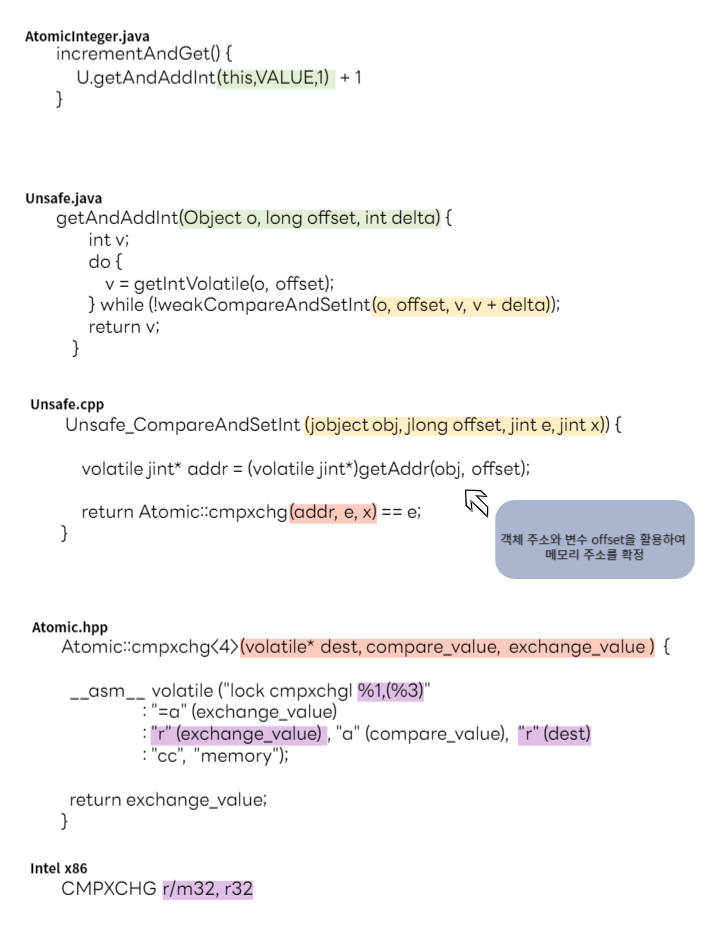
여기까지 왔으면, AtomicInteger 가 machine instruction level 에서 어떤 행동을 하는지 까지 볼 수 있었다. 이를 좀더 간략하게 정리해보자.
정리
코드를 좀더 이해하기 편리하게 추상화하고 변형하여 전체 구조를 나타내 보았다.

Reference
https://github.com/openjdk/jdk/blob/master/src/hotspot/share/prims/unsafe.cpp
https://github.com/openjdk/jdk/blob/master/src/hotspot/os_cpu/linux_x86/atomic_linux_x86.hpp
https://www.intel.com/content/www/us/en/developer/articles/technical/intel-sdm.html
'자바' 카테고리의 다른 글
| 자바 비동기 파헤치기 1편: Future의 내부 구조 (0) | 2025.06.13 |
|---|---|
| [자바] ReentrantLock : NonFairSync의 lock() 동작 원리 (0) | 2025.05.27 |
| [자바] HashMap 파헤치기: put() 메소드는 어떻게 동작할까? (0) | 2025.05.15 |
| JVM Runtime Data Area - 쓰레드 영역 (0) | 2025.05.09 |
| [자바] synchronized는 어떻게 Lock을 거는가? (0) | 2025.05.09 |


